No Data Layer? No Worries !
Here’s What to Do for Your Custom Website
Unlock the Full Power of GA4 E-Commerce Tracking—Even Without a Pre-Built Data Layer

Analytics ⑊ GTM Tracking Set Up on a Custom Website

- Post by : Absarjoy
- 10:37 pm
- 10-05-2022
In today’s fast-moving digital landscape, data is everything. Every click, scroll, and purchase tells a story—and tools like Google Analytics 4 (GA4) help you capture and understand those stories to drive smarter marketing decisions.
But what if your custom-built website doesn’t have a data layer?
Does that mean you’re out of luck when it comes to advanced e-commerce tracking?
Absolutely not.
What Is a Data Layer, and Why Does It Matter?
A data layer is a JavaScript object that acts as a bridge between your website and analytics tools like GA4. It collects structured data about user behavior, transactions, and interactions, and passes it to your tracking platform.
Traditionally, websites use a data layer to track:
- Product views
- Add-to-cart actions
- Purchases
- Checkout behavior
- And more…
While many e-commerce platforms have built-in data layers, custom websites often don’t—which can be a challenge, but not a roadblock.

No Data Layer? Here’s What to Do Instead
Even without a pre-existing data layer, you can still implement robust GA4 tracking using custom JavaScript and a manual setup. Here’s how:
1. Assess Your Website Structure
Begin by reviewing your website and identifying key e-commerce interactions to track:
- Product page views
- Add-to-cart clicks
- Checkout steps
- Completed transactions
2. Inject JavaScript for Data Capture
Manually create a data layer-like object using JavaScript on key pages. Populate this object with dynamic values like:
- Product name, ID, price
- Category
- Quantity
3. Implement GA4 Event Tracking
Use Google Tag Manager or directly embed scripts to send events to GA4 when specific user actions occur.
Common GA4 events include:
- view_item
- add_to_cart
- purchase
- begin_checkout
4. Test and Debug Thoroughly
Before going live:
- Use GA4’s DebugView to ensure events are firing correctly
- Check for errors or missing values
- Validate all e-commerce steps
5. Monitor & Optimize
Once live, monitor your GA4 reports:
- Analyze user behavior through funnel reports
- Track drop-offs and high-converting paths
- Continuously refine your setup to improve accuracy and ROI
How to push data in Data Layer?
dataLayer.push
So what is dataLayer.push in the first place? It’s a code that enables one to add/update data that is stored in the Data Layer, for example:

But what does it mean? Well, let’s have a quick refresher on what the Data Layer is. P.S. If (after reading this blog post) the topic still looks confusing, consider enrolling in my Google Tag Manager course for Beginners where I explain what dataLayer.push is in much greater detail.
Store and update data in the data layer
There are two ways to send data into the data layer. While one method is recommended in most cases, it’s useful to understand both:
dataLayer.push (Not recommended)
- Data Layer Declaration (Initialization)
You can declare the data layer as a JavaScript array before the Google Tag Manager container snippet loads.This method is useful when you want to insert data into the Data Layer as soon as the page loads—for example, passing a user ID. Doing so allows you to use that value immediately in GTM, such as with an All Pages trigger.
To achieve this, your developers must place the Data Layer declaration snippet above the Google Tag Manager container snippet (this order is critical). Example:

dataLayer.push (recommended)
- The second method of putting data in the data layer is dataLayer.push, which is recommended and should be your only choice. Regardless of where you place it (below or above the Google Tag Manager container), dataLayer.push will work properly. Here are a few examples: You have a newsletter signup form (which cannot be easily tracked with a default GTM’s form listener), so you decided to ask a website developer to fire a Data Layer event once a new subscriber has successfully entered his/her email on your website:

If you wish, you can ask your developer for additional information (e.g., form location (because you might have more than one form on the same page)).

2. When a visitor adds a product to his/her cart, a Data Layer event (containing the product’s information) could be fired.
One more thing. Suppose you compare code snippets in this blog post to those explained in the official Google Tag Manager documentation for developers. In that case, you’ll notice that my code examples also have the “window” prefix (instead of dataLayer.push, I use window.dataLayer.push).
This helps with potential scope conflicts in the JavaScript code. Those conflicts are pretty rare, but still possible.
Therefore, you should add a prefix window to the dataLayer.push as a rule of thumb. The final dataLayer.push code snippet could look like this:

By the way, the dataLayer name is case-sensitive. This means that only the letter L must be uppercase:
- DataLayer.push will not work (because D is uppercase)
- datalayer.push will also not work (all letters are lowercase, although L should have been uppercase).
One more dataLayer.push example
Previously mentioned dataLayer.push examples are pretty basic, but if you need to, you can also push data as objects or arrays, for example:

What happened here is that with one dataLayer.push, we also pushed an array (items) containing two objects. Each object contains the same set of keys (item_id, item_name, price, quantity), but their values differ. And that’s logical because two different products will usually have different characteristics.
💡 Why a Custom Data Layer Setup Is Worth It
While setting up a custom data layer requires manual implementation, the long-term benefits make it a valuable investment for any website.
🔍 Precise Tracking
Instead of relying on generic tracking, a custom data layer allows you to define exactly which user interactions, events, and conversions should be tracked. This ensures you’re collecting the right data that truly reflects your business model, whether that’s form submissions, product interactions, or lead-generation events.
🎯 Tailored Analytics
Every website is unique. A custom data layer lets you structure your tracking according to your site’s architecture, user flows, and marketing goals. This flexibility means you’re not forced into a one-size-fits-all setup—your analytics are aligned directly with how your business operates.
📊 Data-Driven Decisions
With clean, structured, and accurate data flowing through your data layer, you can trust the insights you gather. This leads to smarter decisions—such as improving user experience (UX), optimizing conversion funnels, reducing wasted ad spend, and ultimately driving more revenue.
Remember, staying proactive is key—regularly adjust your strategy to account for seasonality and product changes. These shifts directly impact PMax’s optimization, so anticipating and adapting to them ensures your campaigns remain ahead of the curve.
📌Summary
Don’t let the lack of a data layer hold you back.
With some JavaScript knowledge and planning, you can build a custom tracking system that empowers your GA4 setup and fuels your marketing decisions.
The result? Better insights, smarter campaigns, and more conversions.
Latest Projects
Stay updated on our best deals in CRO, Analytics, and Advertising
Best Marketing Tools

Andry Brook
Chef Director, Rafel Fashion Ltd, UAE

Anamica Sen
Director Sales
We honestly reference Hostinger as the benchmark for our engineers when providing support. We honestly reference Hostinger as the benchmark for our engineers when providing support.We honestly reference Hostinger as the benchmark for our engineers when providing support.

Synthi Hook
Managing Director, Soft Fashion Ltd, Canada

Testi
Techno, UAE

Robert Lee
Techno Manager, United States
I could manage the hosting, domain name, and SSL certificate in one place, which was really refreshing.
Thanks for checking out my post
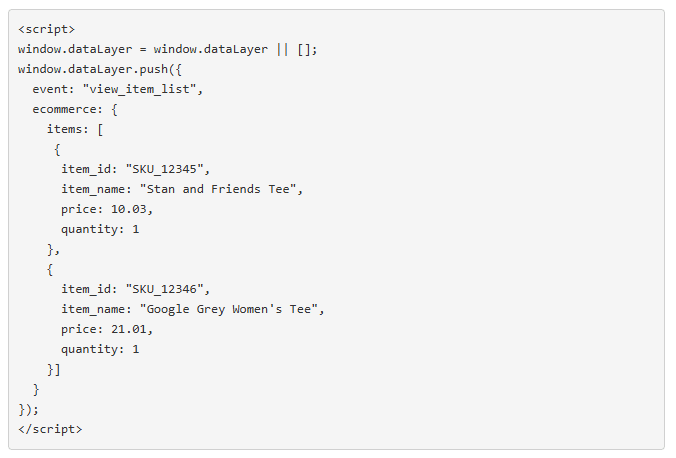
Need Help with Your Data Layer or GA4 Tracking?
Reach out today and unlock the full power of your analytics and expert assistance.